
Photo by Rubaitul Azad on Unsplash
A Deep Dive into Containerization, CI/CD, and AWS for Django Rest Applications- Part 2
Introduction
In the rapidly evolving realm of software development, a powerful synergy emerges from the integration of containerization, CI/CD, and cloud service providers. In the first part of this article, we dived into the transformative synergy between containerization, CI/CD, and cloud services. We explored the capabilities of Docker, CircleCI, and AWS while configuring essential cloud resources (RDS, S3 Bucket) using AWS as the provider.
In this exhilarating second part, we will explore the application of Docker and CircleCI in conjunction with your Django REST application. Discover how Docker provides a portable and isolated environment, while CircleCI automates your build, test, and deployment processes.
Prerequisites
To go through this tutorial, you will need to have the following installed:
TABLE OF CONTENT:
Django installation and setup
Docker Configuration
CircleCI configuration
Automated test
Git Deployment
Django app installation and setup
Note: For this project, I will be using Linux as the operating system
The code below would achieve this:
Create a folder
Change the directory into that folder
Create a virtual environment and open the folder in the code editor (Vscode)
Activate a virtual environment
Install django
Create a Django project blog and a Django app blogapp
$ mkdir CI-CD-DJango-Docker
$ cd CI-CD-Django-Docker
$ virtualenv env && code .
$ source ./env/bin/activate #for linux user
$ ./env/scripts/activate  #for windows users only
$ pip install django
$ django-admin startproject blog
$ cd blog && python3 manage.py startapp blogapp
Install these requirements
$ pip install djangorestframework boto3 whitenoise pyscopg2-binary python-decoupleNOTE : boto3 is a requirement for an S3 bucket, pyscopg2-binary is a PostgreSQL adapter for Python. It allows Python applications, including Django, to interact with PostgreSQL databases, and whitenoise is a Python library which serves static files.
create a requirements.txt file to store our dependencies with this command below
$ pip freeze > requirements.txt
In your Django app create a urls.py and serializer.py file
Add these Python modules in your settings.py
import os
from decouple import config
Add restframework and your Django app to the installed app
INSTALLED_APPS = [
   . . .
   'rest_framework',
   'blogapp',
]
Add whitenoise middleware to your Middleware just below the security middleware:
MIDDLEWARE = [
   . . .
   'whitenoise.middleware.WhiteNoiseMiddleware',
   . . .
]
Set DEBUG to false. This is Django recommended practice for production. In this project, we will follow production practice because we are containerizing our Django application which is why we are using whitenoise to server our static files
# SECURITY WARNING: don't run with debug turned on in production!
DEBUG=False
Since DEBUG is set to False, we need a log file to keep track of our errors in case we have one. Paste the code below in your settings.py at the bottom of the file, to create a log file general.log.
# setting logger for production sake since debug is set to false
LOGGING = {
    "version": 1,
    "disable_existing_loggers": False,
    "handlers": {
        "console": {"class": "logging.StreamHandler", "formatter": "simple"},
        "file": {
            "class": "logging.FileHandler",
            "filename": "general.log",
            "formatter": "verbose",
            "level": config("DJANGO_LOG_LEVEL", "WARNING"),
        },
    },
    "loggers": {
        "": {  # The empty string indicates ~ All Apps including installed apps
            "handlers": ["file"],
            "propagate": True,
        },
    },
    "formatters": {
        "verbose": {
            "format": "{asctime} ({levelname}) -  {module} {name} {process:d} {thread:d} {message}",
            "style": "{",
        },
        "simple": {
            "format": "{asctime} ({levelname}) -  {message}",
            "style": "{",
        },
    },
}
In Django, anytime DEBUG is set to False, you need to set the ALLOWED_HOST, since we are not deploying our project on any hosting platform, let's set the ALLOWED_HOST to accept traffic from any host.
ALLOWED_HOSTS = ['*'] #do not do this on production, always provide your permitted hostname's URL
Now let's configure our static directory
STATIC_URL = 'static/'
STATIC_ROOT = BASE_DIR/ 'staticfiles'
MEDIA_URL = 'media/'
MEDIA_ROOT = BASE_DIR/ 'media'
Configure whitenoise and S3 backend with the code below
# S3 bucket configuration
AWS_ACCESS_KEY_ID = config('AWS_ACCESS_KEY_ID')
AWS_SECRET_ACCESS_KEY = config('AWS_SECRET_ACCESS_KEY')
AWS_STORAGE_BUCKET_NAME = config('AWS_STORAGE_BUCKET_NAME')
AWS_S3_REGION_NAME = config('AWS_S3_REGION_NAME')
AWS_S3_ENDPOINT_URL = config('AWS_S3_ENDPOINT_URL') #https://s3.<your-AWS-region>.amazonaws.com/<your-bucket-name>

# File storage configuration
STORAGES = {

   'default': {
       'BACKEND': 'storages.backends.s3boto3.S3Boto3Storage',
       'ENDPOINT_URL': config('AWS_S3_ENDPOINT_URL'),
   },
   'staticfiles': {
       "BACKEND": 'whitenoise.storage.CompressedStaticFilesStorage',
   },
}
Our Django application is beginning to take shape, now let's configure our database. Django uses dbsqlite3 as the default database but we can change the configuration to any database of our choice supported by Django. Let's configure it to Postgres which is the RDS resource we created on AWS
DATABASES = {
   'default': {
       'ENGINE': 'django.db.backends.postgresql',
       'NAME': config('DB_NAME'), #your AWS Postgres DB Instance Identifier
       'USER': config('DB_USER'), #your postgres RDS master username
       'PASSWORD': config('DB_PASSWORD'),
       'HOST': config('DB_HOST'), #your postgres RDS endpoint
       'PORT': config('DB_PORT'),
   }
}
In your project directory, create a .env file and populate it with your Django's SECRET_KEY, AWS S3 and Postgres RDS secret credentials.
In your settings.py replace the SECRET_KEY with this
SECRET_KEY =config('DJANGO_SECRET')
Now let's configure our project urls.py
from django.contrib import admin
from django.urls import path, include
from django.conf.urls.static import static
from django.conf import settings

urlpatterns = [
   path('admin/', admin.site.urls),
   path('', include('blogapp.urls')),
]+ static(settings.MEDIA_URL, document_root=settings.MEDIA_ROOT)
Let's create a blog model in models.py
from django.db import models

class Blog(models.Model):
   created_at = models.DateTimeField(auto_now_add=True)
   title = models.CharField(max_length=50, unique=True)
   file = models.FileField(null=True, blank=True)
   body = models.TextField()

   class Meta:
       ordering = ['-created_at']
We created a Blog table with a title, body, and file (optional) column. Now let’s create a model serializer and our view
In your serializer.py add the code below
from rest_framework import serializers
from .models import Blog

class BlogSerializer(serializers.ModelSerializer):

   class Meta:
       model = Blog
       fields = ['id', 'title', 'body', 'file']
Let’s create a view for our project using the ListCreateAPIView which is a child of the generics class. It helps in handling the post and get method which can also be overridden.
In your views.py add the code below
from rest_framework.response import Response
from rest_framework import status, generics
from rest_framework.views import APIView
from .models import Blog
from .serializers import BlogSerializer

class BlogListView(generics.ListCreateAPIView):

   queryset = Blog.objects.all()
   serializer_class = BlogSerializer
Let's configure the urls.py in your blogapp
from django.urls import path
from .views import BlogListView

urlpatterns = [
   path('blogposts/', BlogListView.as_view(), name='blogposts'),
]
Sincerely, you've done good work but we still have a long way to go
Now let's run a database migration
$ python3 manage.py makemigrations
$ python3 manage.py migrate
After migrating you should see this
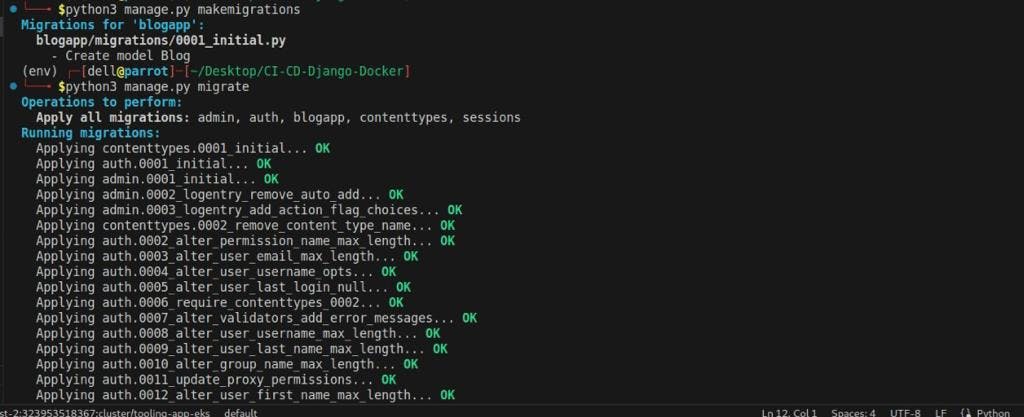
Let’s write a test to create a pipeline for our CI/CD. Add the below code to your test.py
from django.urls import reverse
from rest_framework import status
from rest_framework.test import APITestCase
from blogapp.models import Blog
from blogapp.serializers import BlogSerializer

class MyModelListViewTest(APITestCase):

   def setUp(self):
       self.url = reverse('blogposts')
       self.data = {
           'title': 'How to containerized a django application',
           'body': 'This is a test'
           }

   def test_create_mymodel(self):
       response = self.client.post(self.url, self.data)
       self.assertEqual(response.status_code, status.HTTP_201_CREATED)
       mymodel = Blog.objects.get(pk=response.data['id'])
       serializer = BlogSerializer(mymodel)
       self.assertEqual(response.data, serializer.data)
Create a Dockerfile in your project directory and add this code below
# The image you are going to inherit your Dockerfile from
FROM python:3.9-alpine
# Set the /django_blog directory as the working directory
WORKDIR /app
#create a group and add user to the group
RUN addgroup sytemUserGroup && adduser -D -G sytemUserGroup developer
#grant executable permission to the group
RUN chmod g+x /app
# Create a user that can run your container
USER developer
ENV PYTHONUNBUFFERED 1
# Set environment variables for AWS RDS and S3
ENV DB_HOST=${DB_HOST}
ENV DB_NAME=${DB_NAME}
ENV DB_PORT=${DB_PORT}
ENV DB_USER=${DB_USER}
ENV DB_PASSWORD=${DB_PASSWORD}
ENV DJANGO_SECRET=${DJANGO_SECRET}
ENV AWS_ACCESS_KEY_ID=${AWS_ACCESS_KEY_ID}
ENV AWS_SECRET_ACCESS_KEY=${AWS_SECRET_ACCESS_KEY}
ENV AWS_STORAGE_BUCKET_NAME=${AWS_STORAGE_BUCKET_NAME}
ENV AWS_S3_REGION_NAME=${AWS_S3_REGION_NAME}
ENV AWS_S3_ENDPOINT_URL=${AWS_S3_ENDPOINT_URL}
# Copy the requirements.txt file adjacent to the Dockerfile
COPY ./requirements.txt requirements.txt
# Install the requirements.txt file in Docker image
RUN pip install -r requirements.txt
ENV DEBUG=${DEBUG}
# copy the django project into the container image
COPY . .
CMD ["python3", "manage.py", "runserver", "0.0.0.0:8000"]
FROM python:3.9-alpine
In this line, we specify the base image for your Dockerfile. Here, it uses the python:3.9-alpine image, which is a lightweight version of python 3.9 based on the Alpine Linux distribution
WORKDIR /app
This line sets the working directory inside the Docker container where your application code will be copied and executed.
RUN addgroup sytemUserGroup && adduser -D -G sytemUserGroup developer
RUN chmod g+x /app
USER developer
These lines create a user named "developer" and switch to that user for running the container. This is a security best practice to avoid running the container as the root user.
ENV PYTHONUNBUFFERED 1
This line sets the PYTHONUNBUFFERED environment variable to 1, which ensures that the standard output and error streams are flushed immediately, allowing you to see the real-time output of your application.
ENV DB_HOST=${DB_HOST}
ENV DB_NAME=${DB_NAME}
ENV DB_PORT=${DB_PORT}
ENV DB_USER=${DB_USER}
ENV DB_PASSWORD=${DB_PASSWORD}
ENV DJANGO_SECRET=${DJANGO_SECRET}
ENV AWS_ACCESS_KEY_ID=${AWS_ACCESS_KEY_ID}
ENV AWS_SECRET_ACCESS_KEY=${AWS_SECRET_ACCESS_KEY}
ENV AWS_STORAGE_BUCKET_NAME=${AWS_STORAGE_BUCKET_NAME}
ENV AWS_S3_REGION_NAME=${AWS_S3_REGION_NAME}
ENV AWS_S3_ENDPOINT_URL=${AWS_S3_ENDPOINT_URL}
These lines set environment variables for various configuration settings related to AWS RDS, S3, and Django secret key. These variables are expected to be passed during the container runtime.
COPY ./requirements.txt requirements.txt
RUN pip install -r requirements.txt
These lines copy the requirements.txt file from the current directory into the Docker image and install the Python dependencies specified in that file using pip.
ENV DEBUG=${DEBUG}
This line sets the DEBUG environment variable. Its value should be provided during the container runtime.
COPY . .
This line copies the entire content of the current directory (your Django project) into the Docker image.
CMD ["python3", "manage.py", "runserver", "0.0.0.0:8000"]
This line specifies the command to run when the container starts. It runs the Django development server manage.py runserver on the IP address 0.0.0.0 and port 8000.
This Dockerfile sets up the environment and dependencies required to run your Django application in a Docker container.
Now create a docker-compose.yaml file in your project directory and add the code below
# Version of docker-compose to use
version: "3"
services:
 web:
   build: .
   # Maps port on the local machine to port on Docker image
   ports:
     - "8000:8000"
   env_file: .env
   volumes:
   # Copy changes made to the project to your image in real-time.
     - .:/app
version: "3"
This line specifies the version of the docker-compose file format being used.
services: web: build: .
This section defines a service named web. The service is built using the Dockerfile located in the current directory (.) and represents your Django web application.
ports: - "8000:8000"
This line maps port 8000 from the Docker container to port 8000 on the local machine. It allows you to access the web application running inside the container through localhost:8000 on your local machine.
env_file: .env
This line specifies the location of the .env file, which contains environment variables for your application. The environment variables defined in the file will be available to the containerized application.
volumes: - .:/app
This line mounts the current directory (.) to the /app directory inside the container. It enables real-time synchronization of changes made to the project files on your local machine with the application running inside the container.
This docker-compose file allows you to build and run your Django web application as a Docker service, providing easy port mapping, environment variable configuration, and real-time file synchronization.
Let's compile our static file since we are using whitenoise rather than Django REST's default. Run the command below to achieve that
$ python3 manage.py collectstatic
Now let's spin up your docker to containerize our Django application. To achieve this, we need to build our docker image and run the command below to achieve this
$ docker-compose up --build
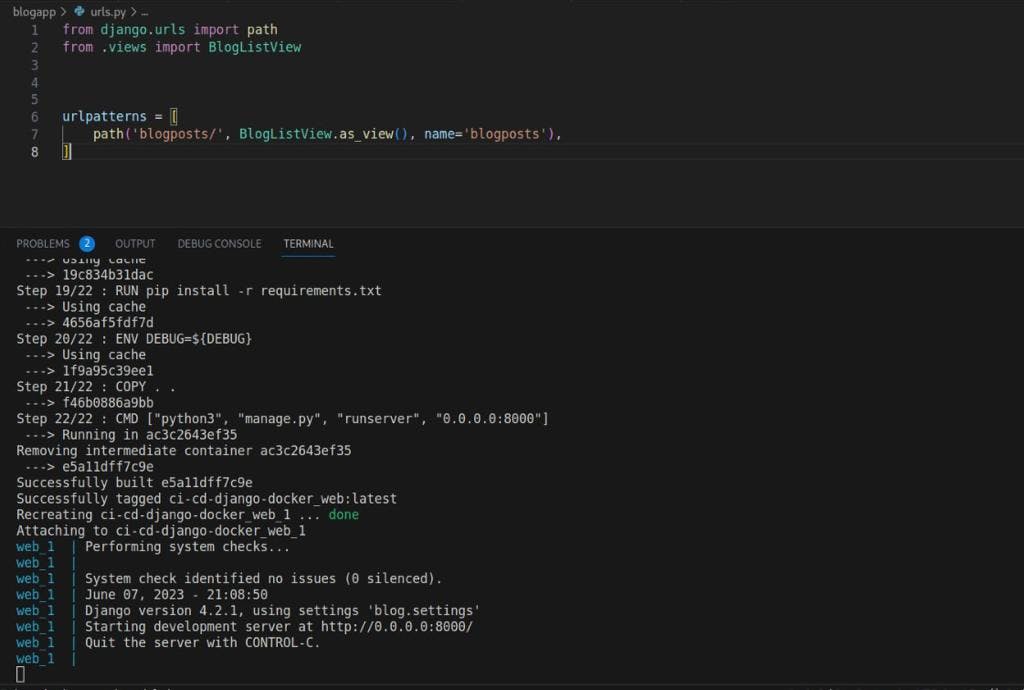
Open your browser, visit your endpoint 0.0.0.0:8000/<your app url>, and create a blog post.
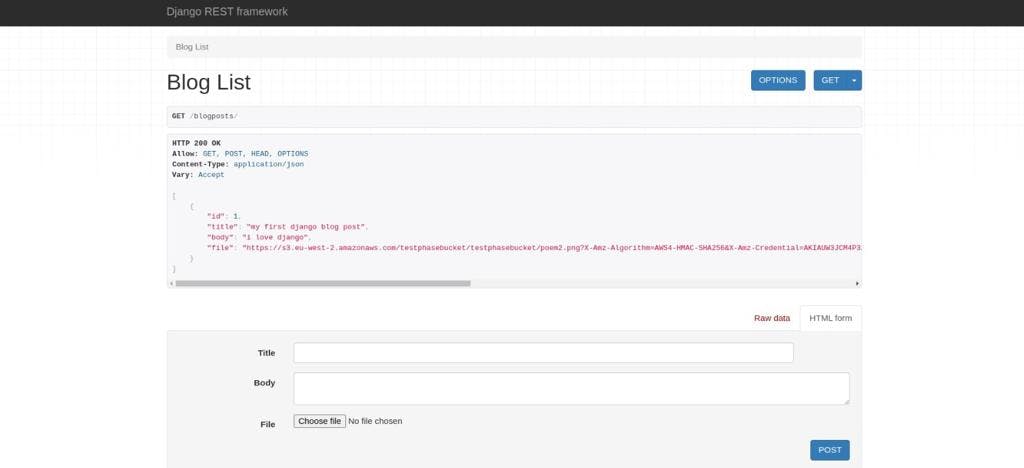
From the above image, we would see that the file is now being stored in our AWS S3 bucket as we expected. Good job so far, now that we are done with containerizing our Django application, let's set up CircleCI for our CI/CD.
CircleCI configuration
Prerequisite:
- Register on CircleCI to give you access to the dashboard.
On your local machine, create .circleci folder in your project directory, in the .circleci folder, create a config.yml file and add the code below to the file
version: 2.1
orbs:
 python: circleci/python@2.0.3
jobs:
 build_and_test:
   executor: python/default
   docker:
     - image: cimg/python:3.10.2
   steps:
     - checkout
     - python/install-packages:
         pkg-manager: pip
     - run:
         name: Run tests
         command: |
           python manage.py test
 build_and_test_docker:
   parallelism: 4
   docker:
     - image: cimg/python:3.10.2
   steps:
     - checkout
     - setup_remote_docker:
         version: 20.10.7
         docker_layer_caching: true
     - run:
         name: Configuring environment variables
         command: |
           echo "DB_HOST=${DB_HOST}" >> .env
           echo "DB_NAME=${DB_NAME}" >> .env
           echo "DB_PORT=${DB_PORT}" >> .env
           echo "DB_USER=${DB_USER}" >> .env
           echo "DB_PASSWORD=${DB_PASSWORD}" >> .env
           echo "DJANGO_SECRET=${DJANGO_SECRET}" >> .env
           echo "AWS_ACCESS_KEY_ID=${AWS_ACCESS_KEY_ID}" >> .env
           echo "AWS_SECRET_ACCESS_KEY=${AWS_SECRET_ACCESS_KEY}" >> .env
           echo "AWS_STORAGE_BUCKET_NAME=${AWS_STORAGE_BUCKET_NAME}" >> .env
           echo "AWS_S3_REGION_NAME=${AWS_S3_REGION_NAME}" >> .env
           echo "AWS_S3_ENDPOINT_URL=${AWS_S3_ENDPOINT_URL}" >> .env

     - run:
         name: Build and start Docker Compose services
         command: |
           docker-compose build
           docker-compose up -d
     - run:
         name: Stop and remove Docker Compose services
         command: |
           docker-compose down
workflows:
 run-build-test:
   jobs:
     - build_and_test
     - build_and_test_docker
version: 2.1
This line specifies the version of the CircleCI configuration file format being used.
orbs: python: circleci/python@2.0.3
This section imports the Python orb, which provides pre-built job and command definitions for working with Python projects.
jobs: build_and_test: executor: python/default
This defines a job named build_and_test that uses the python/default executor, which provides a Python environment for running the job steps.
docker: - image: cimg/python:3.10.2
This specifies the Docker image to use for running the job. In this case, it uses the cimg/python:3.10.2 image, which is based on python 3.10.2.
steps: - checkout - python/install-packages: pkg-manager: pip
- run: name: Run tests
  command: | python manage.py test
These steps include checking out the code, installing Python packages using pip, and running tests for the Django application.
build_and_test_docker: parallelism: 4 docker: - image: cimg/python:3.10.2
This defines another job named build_and_test_docker that also uses the cimg/python:3.10.2 Docker image.
steps:
     - checkout
     - setup_remote_docker:
         version: 20.10.7
         docker_layer_caching: true
     - run:
         name: Configuring environment variables
         command: |
           echo "DB_HOST=${DB_HOST}" >> .env
           echo "DB_NAME=${DB_NAME}" >> .env
           echo "DB_PORT=${DB_PORT}" >> .env
           echo "DB_USER=${DB_USER}" >> .env
           echo "DB_PASSWORD=${DB_PASSWORD}" >> .env
           echo "DJANGO_SECRET=${DJANGO_SECRET}" >> .env
           echo "AWS_ACCESS_KEY_ID=${AWS_ACCESS_KEY_ID}" >> .env
           echo "AWS_SECRET_ACCESS_KEY=${AWS_SECRET_ACCESS_KEY}" >> .env
           echo "AWS_STORAGE_BUCKET_NAME=${AWS_STORAGE_BUCKET_NAME}" >> .env
           echo "AWS_S3_REGION_NAME=${AWS_S3_REGION_NAME}" >> .env
           echo "AWS_S3_ENDPOINT_URL=${AWS_S3_ENDPOINT_URL}" >> .env
     - run:
         name: Build and start Docker Compose services
         command: |
           docker-compose build
           docker-compose up -d
     - run:
         name: Stop and remove Docker Compose services
         command: |
           docker-compose down
These steps involve checking out the code, setting up a remote Docker environment, configuring environment variables in a .env file, building and starting Docker Compose services, and finally stopping and removing the services.
workflows: run-build-test: jobs: - build_and_test - build_and_test_docker
This defines a workflow named run-build-test that includes both the build_and_test and build_and_test_docker jobs. The jobs will run in parallel.
This CircleCI configuration file sets up a CI/CD pipeline with two jobs for building and testing a Python project, one without Docker and another with Docker using Docker Compose.
GitHub Deployment
Now you can take a coffee break, it has been a long journey so far but I know you would love to see the end of this.
Moving forward, create a .gitignore file and add the code below
# Python/Django
*.pyc
*pycache/
# Secret keys and environment-specific settings
.env
*.env
# Database files
*.db
*.sqlite3
# Dependency directories
*venv/
*.env/
Create a github repository and push your code
$ git init
$ git add .
$ git commit -m 'my first dockerized-django project'
$ git branch -M main
$ git remote add origin <your-repository>
$ git push -u origin main
Now let's connect our github repository with CircleCI
Go to your CircleCI dashboard and create a project, select your GitHub repository

Click 'Set up Project' and select 'use the .circle/config.yml in my repo'
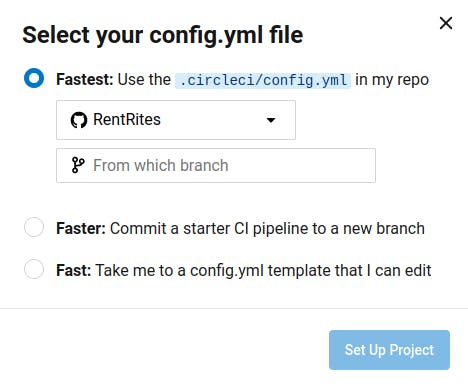
Your pipeline will fail because like we have a .env file on our local machine, we need to provide CircleCI with our secret credentials as docker will need it during the pipeline test.
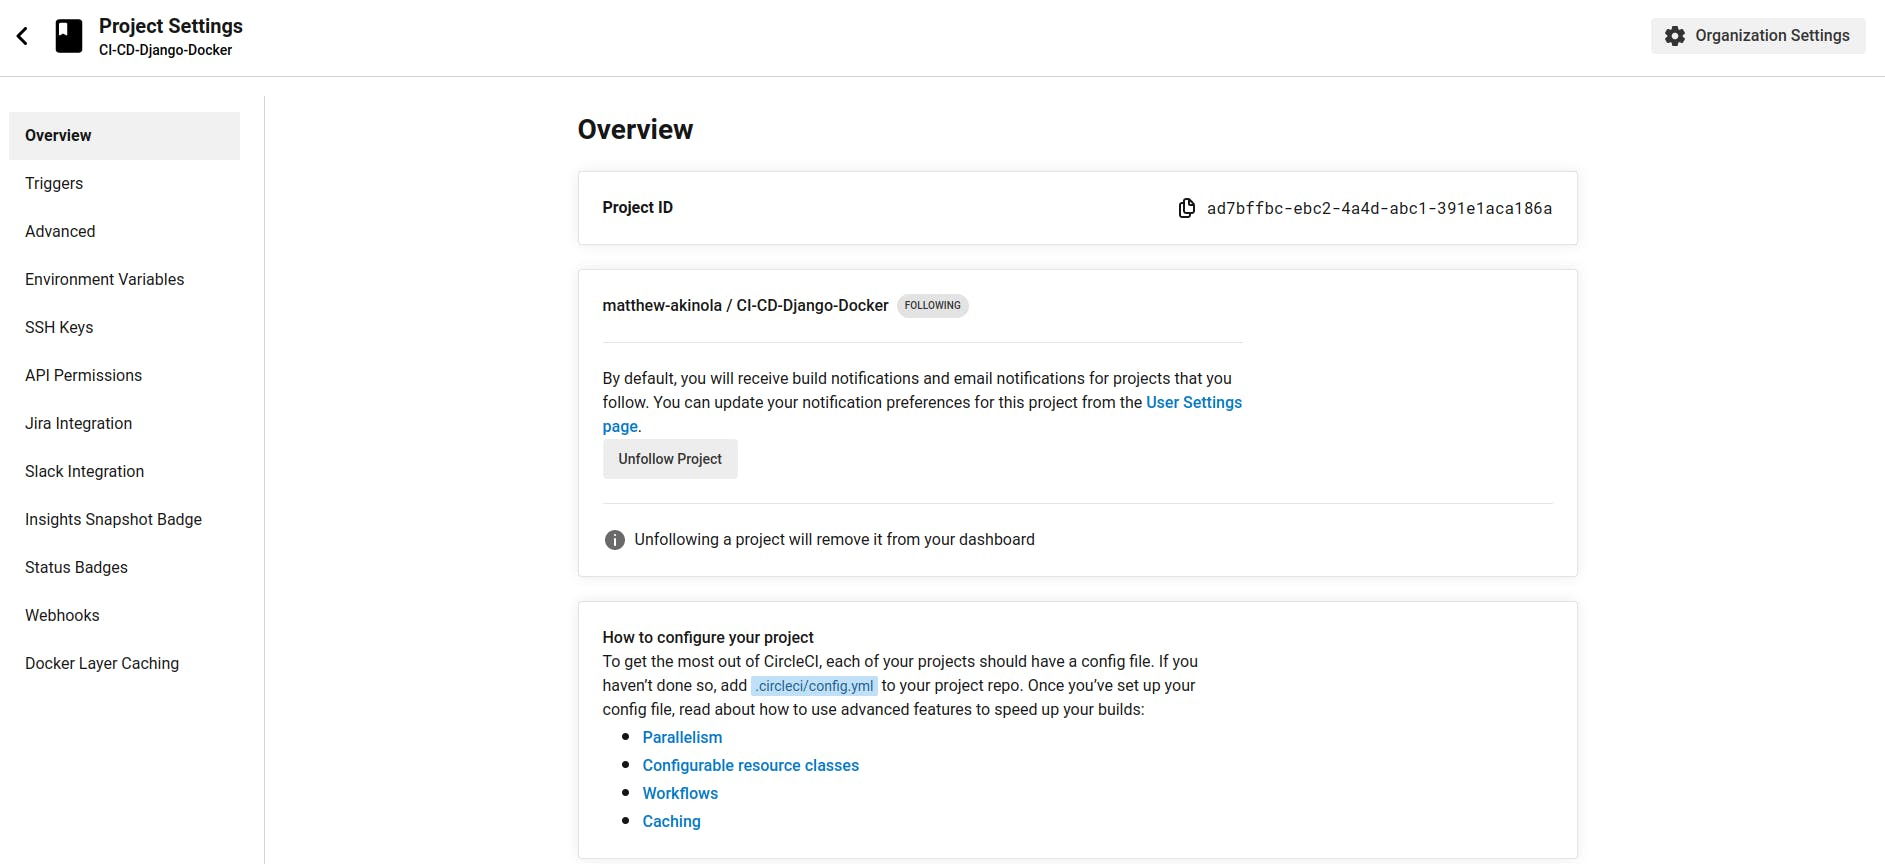
On your top right corner, click on project settings, in the settings, click on environment variables and populate it with your specified credentials in your .env file
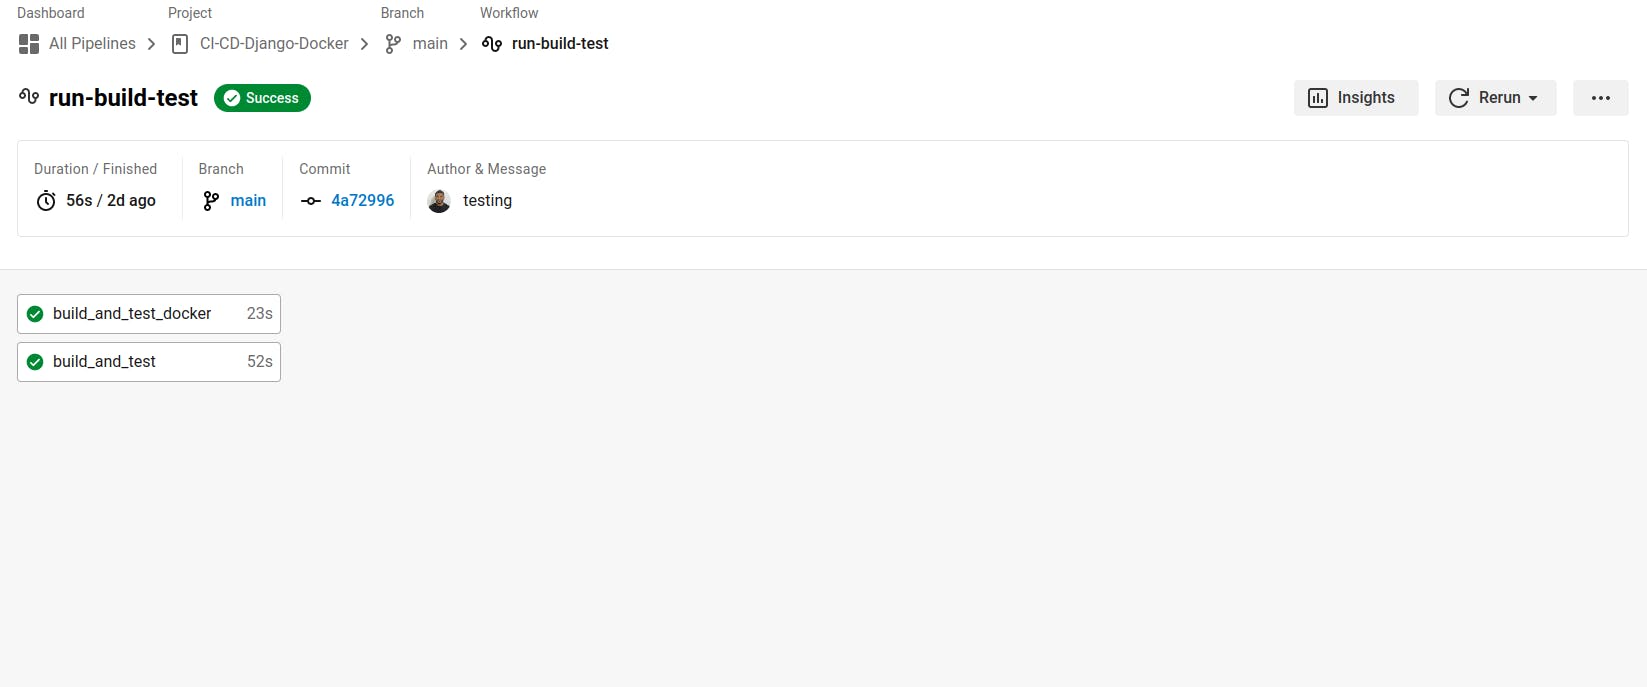
Everything is in order now, make a slight change to your code and push again, this time your pipeline should pass just like the image below.
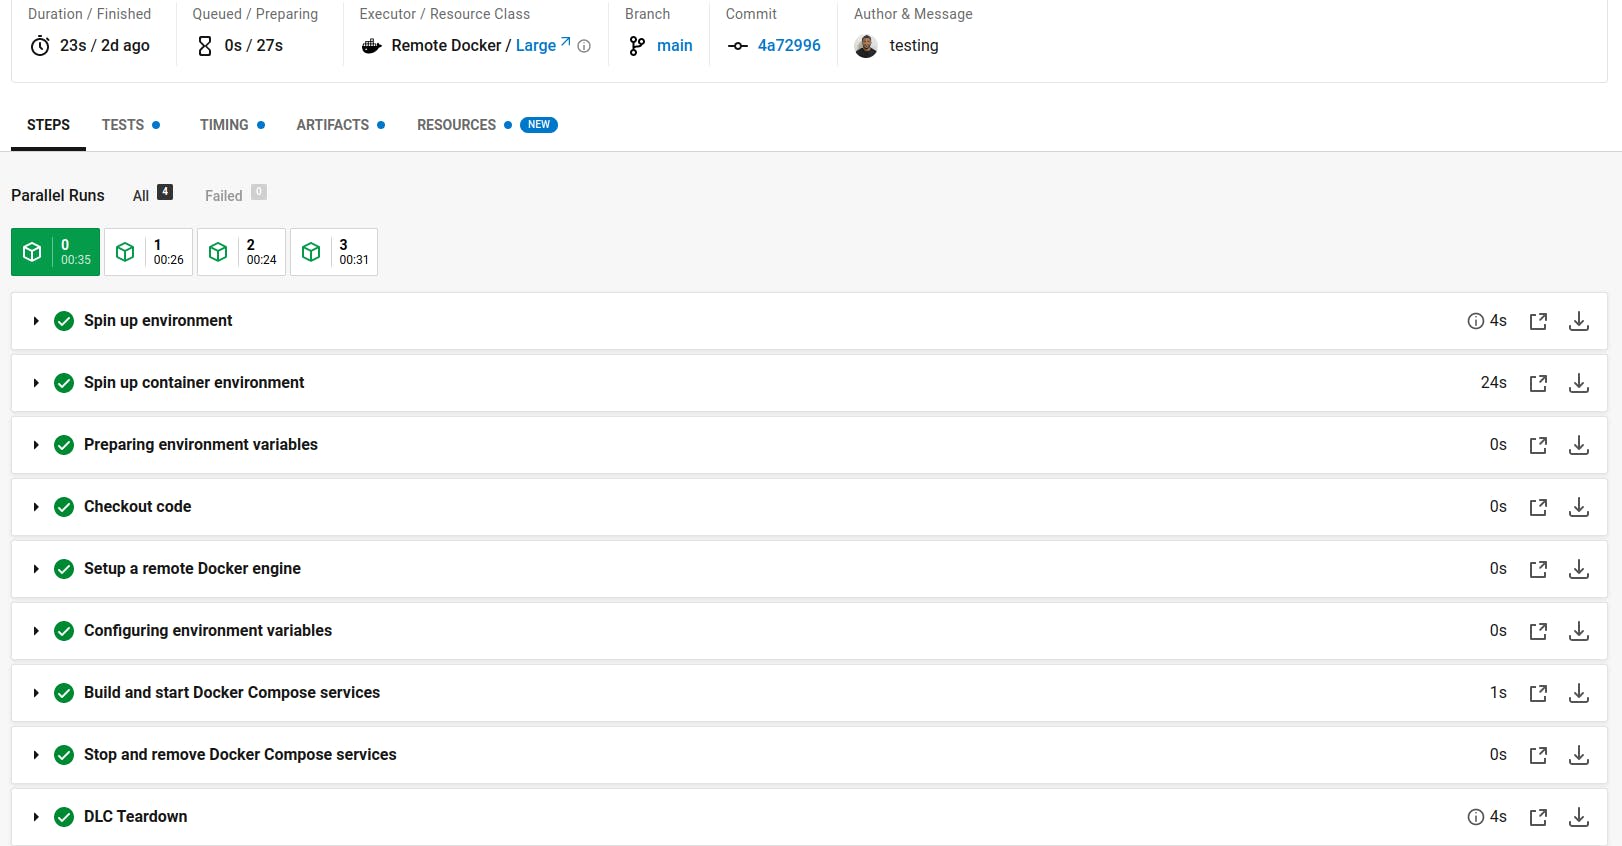
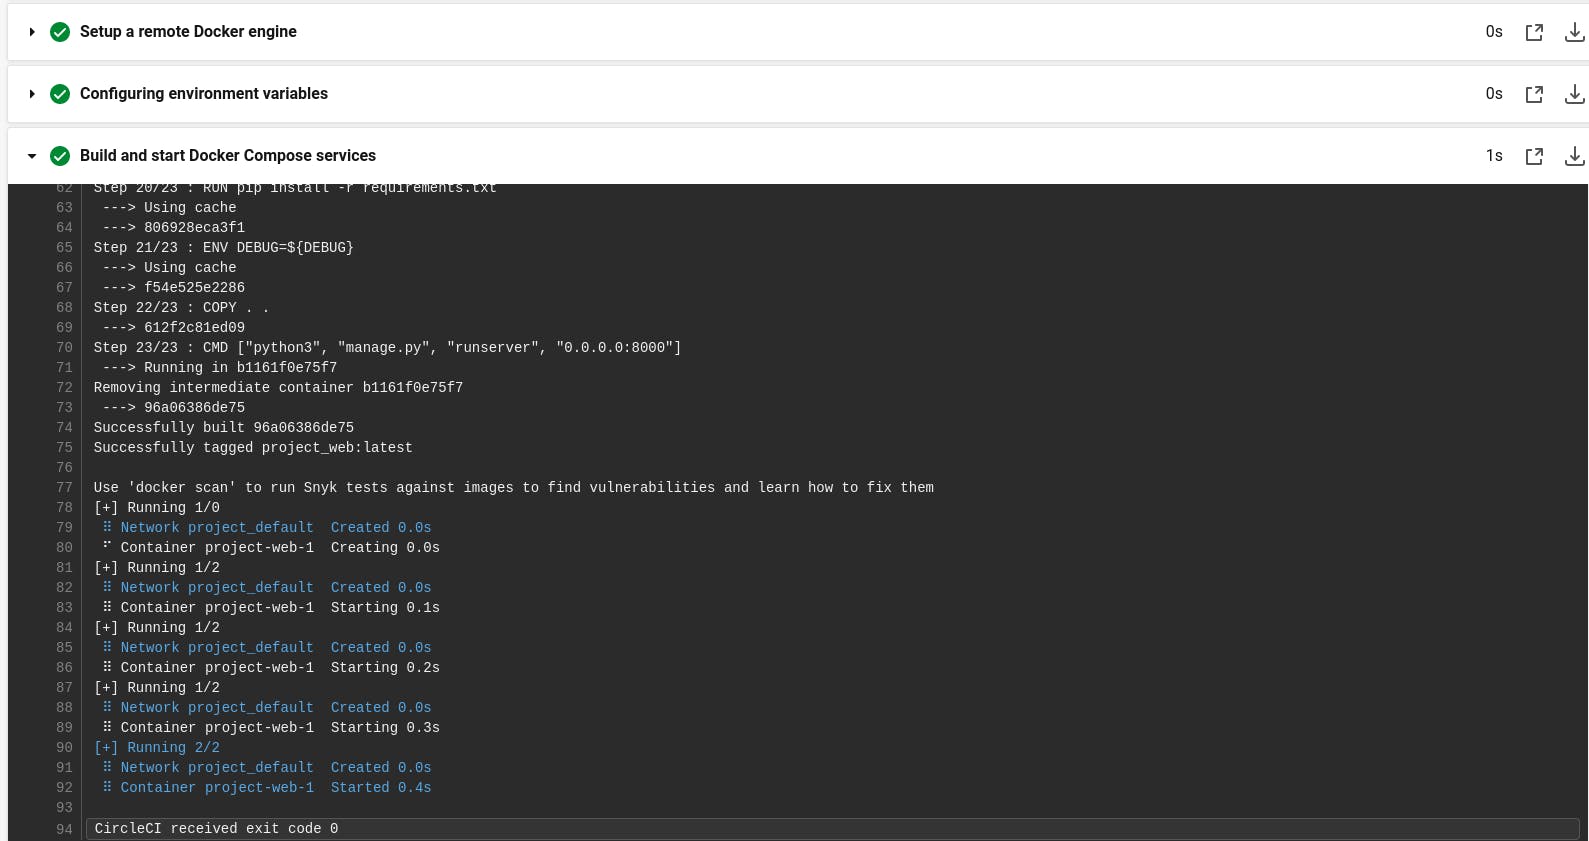
Now inspect your pipelines just like I did below.
Congratulations! You have successfully deployed your containerized Django application on CircleCI.
CONCLUSION
The dynamic combination of containerization, CI/CD, and cloud services has ushered in a new era of software development. With powerful tools like Docker, CircleCI, and Cloud services, developers have the means to revolutionize their workflows and achieve unprecedented efficiency. Embracing these technologies empowers teams to deliver applications faster, enhance scalability, and ensure reliable deployment. As we continue to harness the potential of these transformative solutions, the future of software engineering shines bright with endless possibilities. Embrace the journey and unlock the full potential of your software projects.
